
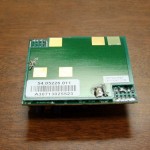
Nortel 1165
At work we use Nortel/Avaya BCM voice over IP telephone systems with an 1100 series IP phone on each user’s desk. We’ve had the system for about 3 years now and have had little to no problems with the phones. Just recently we’ve had to replace several phones due to unknown issues preventing them from powering on or booting. A new phone costs around $500, so after replacing a few I was looking for another solution as we don’t have a warranty or maintenance agreement on them. I suspected a power issue and decided to investigate there first. Sure enough there were capacitors on every one of the broken phones that were busted or about to bust.
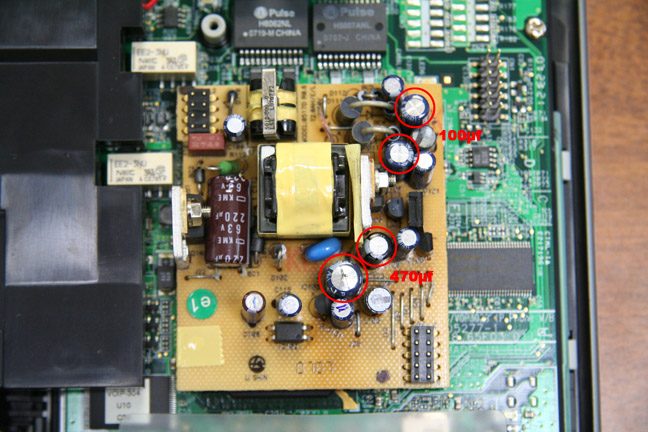
Here is my tutorial on how to fix a phone for about $0.25 each. You’ll need some soldering skills, a soldering iron with a small tip, rosin core solder, desoldering braid, 2 100µf 25V capacitors, 2 470µf 10V capacitors, and about 20 minutes of time per phone. The capacitors I initially used came from Radio Shack, but they are a little expensive and the voltage doesn’t match the originals. The voltage not matching is OK, but it makes them a little large for the spaces provided on the circuit board. I recommend going to Jameco and ordering the ones you need from there. Enough capacitors for me to completely replace the ones that go bad on 50 phones cost me $11 not including shipping. The part numbers I used for ordering were 93761 for the 100µf and 1946279 for the 470µf. Let’s get started!

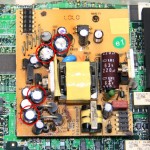
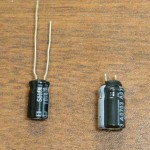
470µf are at the top, 100µf are at the bottom
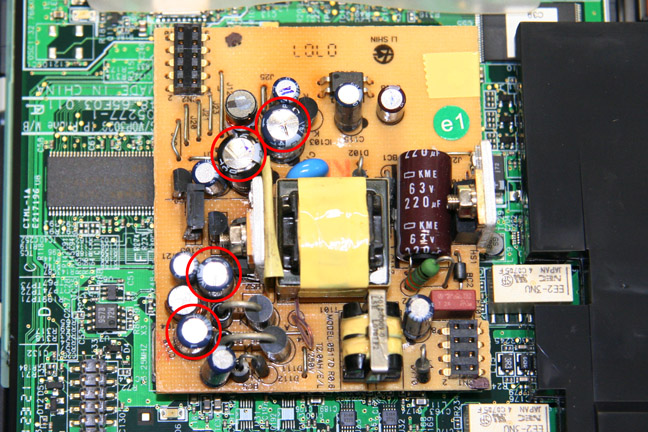
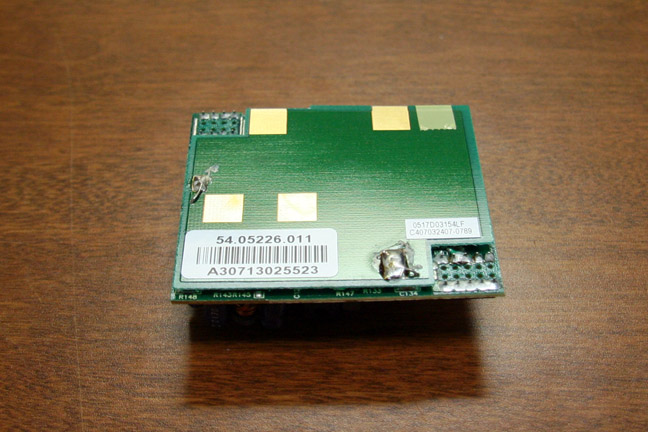
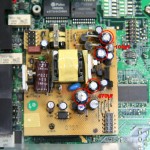
Start by cracking open the phone. There are 7 screws on the back that you remove to open up the casing. You’ll need to reposition the base on the phone to get to all of them. I recommend a skinny phillips screwdriver to get to all of them. Once you open the back of the phone you’ll see a green circuit board with a yellow-ish white one stacked on top of it. This top board is the one you’re after. Use a small flat-head screwdriver to gently pry up the board using the phone casing as a pivot point. Be careful NOT to use other things soldered to the board as a pivot point. You may damage something that can’t be repaired. The picture shows the capacitors that are most likely bad. I’ve repaired phones that only needed one replaced, but sometimes all of them are bad. I think it’s a good practice to just replace them all while things are disassembled. Signs to look for are a bulging top (vent) or a bulging bottom (look at the board from the side). You might also notice a burnt electronic smell or see brown goop on the circuit board around the capacitors.
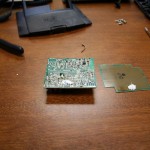
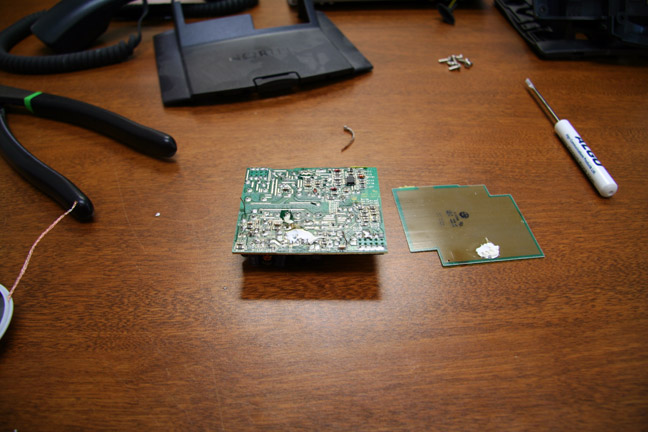
The power board has a flat side with 2 solder points on the back. You’ll need to use the desoldering braid to remove the solder and free the wires connected to them. Bend them up to free them from the board. Next you’ll have to cut a piece of tape holding the 2 pieces together and find the area where some white thermal paste is holding them together. Use a small flat-head screwdriver to gently pry the 2 pieces apart.

Capacitor solder points
Next is the tricky part. Locate the opposite side where the capacitors are soldered to the board. You can mark them with a permanent marker if it helps. place the soldering braid between the iron and the areas you want to remove the solder from to free the capacitors from the board. Make a note of which go where or simply work one at a time. Capacitors have a positive and negative side just like a battery. You’ll notice a stripe on each side noting which wire is which. It’s important to get the polarity correct. If you inspect the area where the capacitor is going, the negative side goes in the hole next to the thick black bubble. Insert both electrodes, flip the board over and apply a little solder to each one. Clip off the excess wire as close to the circuit board as you can. Repeat for all the capacitors. Work in reverse reassembling everything. Put the 2 pieces of the power board back together and re-solder the pins on the back. Slap the power board back on the phone, and give it a test before putting the case back on. If everything has been done correctly, the phone should power on, boot, and you will have saved enough money to make your boss happy. Warranty? Who needs a warranty!
This does leave me wondering about a quality control issue wherever these phones are manufactured. Like I said earlier, we’ve had the phones for over 3 years now and never had any problems, but in the last week I’ve fixed 6 phones.
UPDATE – July 2011: Avaya has issued a Product Correction Notice detailing what to do if you are experiencing this issue. Please check here: https://support.avaya.com/css/P8/documents/100142092
Special thanks to Hugh O’Neill who posted this link it the comments section.
UPDATE – August 2011: After a conversation with a local Avaya rep, I have been told that the part number mentioned in the PCN posted above is for use by Avaya for installs by Avaya techs only. If you are going to replace the modules yourself, you need a different part number and must recieve authorization from Avaya to order it. The part you must order is NTYS17PMPP. This part number is for a box containing 96 power modules. You can only order by the box. You cannot order individual power modules. I was also given a link to download instructions on disassembling the phone and replacing the module. This .zip file can be found at: ftp://ftp.avaya.com/incoming/Up1cku9/tsoweb/11001200/power_module_install.zip
-
- Nortel 1165
-
- 470µf are at the top, 100µf are at the bottom
-
- The back of the power board
-
- Removing the back plate
-
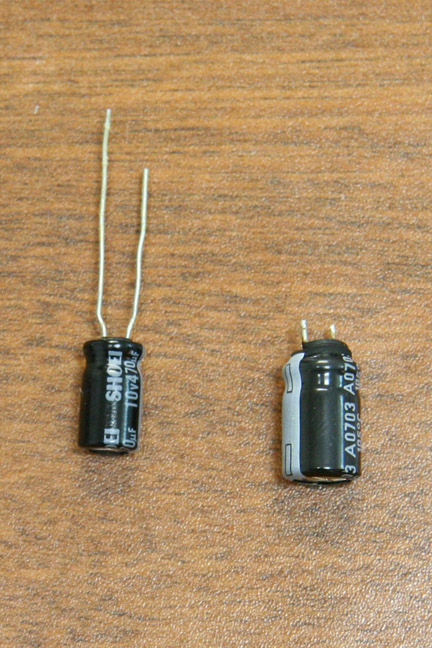
- New capacitor on the left, busted on the right.
-
- Capacitor solder points

-
- Replacement of one capacitor

DUDE!!! You are totally right of course! Thank you for the walkthru as we took a known good working board and replaced it and the phone now boots just fine! I was able to determine that 1 of the capacitors is bad, but I think I would take your advice and replace all 4 … since I am also an electronics engineer I am trained in component level repair as well as design and I think Nortel missed the boat here with this board design. The capacitors clearly state 105 degrees on them and I know these phones get warm so it is surprising that the bad cap I found is friggin touching a heat sink! DOH!!!! Anyway, maybe I can take this up with Avaya … pry not though.
Glad I could help out! I’ve probably used this fix 20 times in the last 3 months. We have about 250 phones and it’s slowly creeping through all of the phones we have. Definitely a quality control or design issue. Hopefully enough people will take notice that Avaya will do something about it. Let me know if you have any results from them and I’ll update the post.
We repair full Line Nortel IP phones Any problem your phone look like new
The problem of failure of these condensers is connected with errors of developers and an incorrect choice of working pressure on power unit condensers.
According to my measurements on condensers C132, C123 working pressure 15V, and condensers used by the developer 470mF-10V are calculated on pressure 10V. Therefore condensers C132, C123 overheat and fail.
I establish to the place of C132 condenser Hitano 470mF-16V and C123 the condenser 330mF-35V or 47mF-65V. Others don’t get on dimensions. The general capacity of condensers appears sufficient for normal work of the power unit.
Besides the similar problem of refusals is at condensers Jtec S118, ?119, ?121. These components fail from an overheat, them I change for the similar.
Less often condenser S112 220mF-63V and stabilizer IC105 KIA7812 microcircuit fails.
GAH!!!! OH NO!!!! We have about 300 so that is crazy we are about identical to your setup!! We use Brocade/Foundry PoE switches … if you tell me you have those too that will be crazy! Our setup is at a remote site and we luckily use TDM phones here locally so we won’t have this same issue with 400 more phones! DOH!
Unfortunately, my boss won’t let me fix them so he is sending them in for repair that comes with a 5 year warranty but that is almost $100 a pop. 🙁
ANYWAY, YES, YOU ROCK!!!!!
At least we have determined that this issue likely effects phones from 2008 and at least 600 of them so far! I said recall from the ‘get-go’
Can you tell me the place where you are having them repaired for $100.00 and a 5 year warranty… What forum did you get the info from about Avaya and their site fix?
So I heard from a forum that Avaya is coming to a site to fix phones for $15 each. Have you decided if you think this is voltage related? Such as, using the higher rated caps do you think they won’t fail again? We wondered if it might be heat related since the failed caps are close to a heat sink.
This is intresting has anyone looked into doing the repair on these as a side job? I know that the customer I work at would be glad to pay 20-25 per phone to get this fixed. and since we have 2500 plus phones …… and lose 2-5 per week (and we are only one site….
Tyson…. what forum did you here that Avaya was going to someones site to make this repair?
Hello Sam also repair these phones for my company. Last month I had repaired over 60 of them for my company and I was awarded employee of the year because I had saved them the cost of buying over 60 new phones (over ($30,000.00). I would be more than happy to do this on the side. I don’t know how I could do it for your company since I am in another country. However please email or call me if you can as I would be very interested. Thanks again. 876-276-7277
I’m thinking it is heat related due to the substance in the capacitors vaporizing causing them to expand or pop from the bottoms or from the vents on top. I haven’t heard anything from Avaya… had great reps before the merger, but since then no one has come to see me, called or even e-mailed…
Sounds like serious design flaw (not thinking of heat dissipation) to me then. Sorry about your bad reps – luckily we know a higher up Engineer that sent this info to the Product Management team and we are supposed to get a response back soon. I will certainly include you.
Thanks again dude! We were able to agree to similar terms that I mentioned. The only changes I see on the board design is that they increased some cap voltage ratings from 25v to 35v and 10v to 16v … supposedly it was running the phones at a Gig instead of 10/100 caused them to overheat! Customers running 10/100 have not seen this issue (yet).
Tyson,
are you taking your phones off of auto and locking them down to a 10BT Network Port Speed?
Tyson, I have started to notice that phones repaired by replacing the components with the same size capacitor with the same voltage rating, are now starting to break again. It’s definitely inadequately rated capacitors. The phones that I fixed with 35v Radio Shack caps near the beginning stages of this discovery are still kicking, while the ones I repaired from identical parts to the original from Jameco sometimes fail again. I’ve also noticed the large black or brown 63v, 220uf cap that lays on it’s side is failing on some boards.
Question for all…. have you seen this more with POE or a power supply or both??
Interesting observations Tyson… All of my phones are running as PoE and Gig speed throughout. Glad to see some more people joining the discussion! Hopefully the word about these phones will continue to spread and Avaya will do something!
We received a box of replacement power modules from Avaya, and have replaced the module in about 200 of our phones.
The e1 module is absolute garbage, we found every single phone manufactured in the first quarter of 2007 (specifically March) died on us.
The new module seems to be a complete redesign which is good.
How did you acquire the replacement modules? Did Avaya charge you anything for them? If so, how much? This is great news and I’d like to start repairing them with replacement modules instead of electronic components.
Thanks for posting!
We had to contact our Avaya Rep and request them, they took a couple weeks to arrive and were around $5-10ea i believe, it all depends on quantity ordered.
To all – the forum is TekTips (best site ever for this stuff). I passed this on to TekTips because it is so helpful and this was obviously a HUGE issue that needed to be known/corrected ASAP.
Yep!! We are getting our modules pretty soon and Bill is right between $5-$8 each depending upon quantity needed. I agree that the e1 modules are not designed properly (issue due to heat dissipation/voltage bleed when running 1gig). I’ll have to get back to you on the 63v 220 cap as to what Avaya replaced it with. Sorry that you replaced them with the same rating capacitor 🙁 They must be getting some extra voltage bleed and with the excess heat they can’t handle it so they “get out of the kitchen”.
To Sam – no we are not locking them down to the slower speed – we have opted for the power modules which all Avaya has done is increase the voltage rating on the problem capacitors). We don’t use power injectors so this is all PoE.
Do yall have a part number that I can ask my rep for? We have 1140E and 1120E phones here… I have a feeling my Avaya rep is going to claim the part doesn’t exist if I don’t have a number to give them.
Tyson: Tek-Tips is awesome… been there many times for help and always found what I needed. Thanks for passing this on to them. Can you link to the post? I’ve also found that Michael McNamara’s blog @ http://blog.michaelfmcnamara.com/ is a great resource.
Certainly slusamson … it is NTYS17PMPP IP PHONE POWER MODULES that we are getting from Avaya. But those come in a bulk pack of 96 modules each, so there may be a slightly different number or your rep may have a better idea if you can break it out differently. Yep, I LOVE TEK-TIPS!
Here is my main post (I have answered on several others):
http://www.tek-tips.com/viewthread.cfm?qid=1641634&page=1
Ahh! Thanks a bunch for the part number and the cross-post to tek-tips!
Tyson,
This part number is not bringing anything up for my reseller. Their distributor is telling them that the part doesn’t exist. Can you get some clarification from your reseller on how they are ordering these things? Thanks!
So I have my 1140E/1120Es running on a Nortel POE BES50 made specifically for the BCM originally. It’s a 1000mbs network, but I had my 11xx sets set to 100mbs. Is that the problem setting you are referring to? I now set the phones to the 10Mb speed. I am confused, should the phone be set at 10Mb or 100Mb to alleviate the problem? They are 2007 phones and I don’t want to cause this problem on my sets!
Most, but not all, have had problems with phone set to 1000mbps. Here, I’ve seen them break no matter what setting we put it on, so in my opinion, you should set it to 1000mbps, since your network will benefit from the speed, and if the phones break, contact your Avaya reseller, give them hell, and then order the replacement power supply. Previous posters have given some part numbers that you can go from. Replacing the board is very simple if you are unfamiliar with soldering.
Correctamundo – I would still run your network at 1gig as slusamson states and complain to Avaya when you start having breakage (you’ll want to replace them all). And at $6 a board that is not bad (but have to do it yourself) or they will do it for $16 or so.
Avaya claimed to us they have not seen any break at 10/100, but damage has been done using 1 gig already so you might as well cause them to fail and get new boards 🙂 It is not that they fail all at once either. We have a couple go down per week so you can do a nice slow phased rollout of replacing the boards and anyone with electronics knowledge should be comfy or just read slusamson’s post (it really is simple).
I’ve contacted my reseller and I’m trying to get part numbers for everything related to this issue. I’m going to update the post with the information when I get it, so it’ll be a part of the tutorial.
Great info. We’ve got over 550 running at 1g on POE and have seen a small number fail due to the power issue mentioned here. All were installed in 8/08.
I was wondering if anyone ran into the problem we’re having. We’ve had over 200 fail since 11/10 due to a sudden failure of the bottom row of keys (Handsfree, * 0, #, and Hold).
Has anyone else seen this problem?
We spoke will Avaya today and there seemed to be only the knowledge of the power module issue. We have no coverage on the phones – never needed it in the past. The cost is killing us. Any insight into this would be appreciated.
We’re suspecting shorted led’s on the thin film PCB might be the culprit, but will have to autopsy our next failure to see if there’s a link.
-H
Also, regarding the power module issue. Avayya did issue a PCN for the problem … https://support.avaya.com/css/P8/documents/100142092
Currently losing about 10 IP phones a month now. All are manufactured early 2007. Does anyone know where I can buy these power supply boards from?
As far as I know the best arrangement to acquire power boards is through Avaya … they should cost you less than $25 each for them to come onsite to replace them all or around $16 if you do it all yourself.
I have not seen the bottom keys fail on any of our sets, but it could be heat related due to the power board issue or it could be an issue with the thin film keypad strip (that plugs into the board). Good luck in troubleshooting. Let us know what you find out. Sounds like Avaya might need to issue yet another PCN 😀
Swapping the power module for a known good one resolves the failed lower keys problems, so it’s still all about the power module.
In an earlier post someone posted the replacement module number as being NTYS17PMPP, but apparently that is a bad number as no reseller seems to be able to find any info on it.
Does anyone have a better number, and still better, a source that we can order from.
Thanks,
-H
If you look above in the post, I updated it with a PCN from Avaya. The part number is listed in there somewhere. I’ve been trying to get my reseller to get the parts for me but I’m still having problems. When I find out the correct way of obtaining them I will update the post again. I would suggest downloading the PCN as a PDF and give it to your Avaya rep or a reseller and see where things go from there. Post back with your results please!
Hi Sluamson,
Any updates?
None right now other than what has been posted at the end of the article above. I have a case of the replacement cards on order and plan on writing a follow-up to the first article when I get them in and see what’s what. Keep checking back. The parts have been on order for about 2 weeks and I haven’t seen them yet, so I’m guessing this is an item that comes directly from a factory.
We have all 300 of our 1140s replaced with power supply but Avaya also has a PCN out for the screen displays going bad (we notice ours are starting to fail – with gray smudges in the upper left where MSB and NRD keys are normally). Supposedly the PCN is setup to replace all the phones for free. So I wonder why we wasted the time now swapping out boards on each phone. Not too bad since it was only five minutes or so per phone. Good luck to you guys on your board replacements!
what about AVAYA 1120E ? CAN ANYBODY DESCRIBE THE WAY OF REPAIRING THE DEFECTIVE CAPACITOR FROM THE POWER SUPLY CARD ??
The repair procedure is the same for all 1100 series phones. I’ve used the same procedure on 1120e and 1140e phones. Hope this helps!
We use POE switches. Just to be clear, a power module is a circuit board in the phone, not an A/C transformer that plugs into a wall outlet, right?
Thanks for the tips!
Yes, you would be correct. The phones have an internal power board that is having the problem, not an external A/C transformer.
gents , we have to keep your updates on AVAYA IP phones, this page became as a reference for many ppl. who r getting benefits from your information & experinces
gents. i have a new case with AVAYA IP phones,i have one with same above power issue , i have fixed it by replacing the capacitors, but the new issue is that the phone became on/off simultaniously , can anyone help on this issue ? knowing that the capacitors replaced with same ratings.
Abdel –
The power on/off blinking is also a similar symptom of the power board issue – the NEW power boards have higher rated capacitors (I know what I am talking about because I am an electronics engineer). Anyway, if you replace the caps with the same rating it is going to fail again (eventually) which was slusamson
Posted April 25, 2011 at 1:24 AM(/b) post from above.
If anyone has other questions on here I check back on occasion but I prefer TekTips since this is not my website and not really the ‘go-to’ source for Nortel/Avaya issues.
We still thank bluemunkey (slusamson) for this site!! It is still just best to order the new power boards from Avaya but it does take months to receive them.
We have more then 2000 phones ,had the same issue getting more then 10 phone down per day, My friend rectify this and i replace the same cap for more then 100 of phones just in 11 min each.
I have a the same problems with the 1120 and 1140 phone’s.
Any one have a contact for AVAYA latin America/El Salvador.
I need contact for validate PCM and to buy the power supply (e1 module)
I found a contact on the Avaya website and try to contact him but no response
PCN Number: 1745H
Hi,
Can anyone supply all the values for the 13 capacitors on 1120e/1140e power board? Need to order replacements urgently, thanks.
I have a few old ones laying in a box in my office. I will look tomorrow and see if I can get some values for you. The values for the problem capacitors are in the post already. I would like to point out that you are better off trying to get the replacement board directly from Avaya as it is a more permanent fix.
Un pienso de gama alta Premium se base en la calidad nutricional de sus alimentos.
La pulpa de remolacha aporta fibra a la ración y la L-carnitina permite al la transformación en el metabolismo de las
grasas.
hi to all!
i have 10 dead(\almost dead) 1140E phones, some of them even does not power on, some of them does, but there is only blue screen, without any info (boot progress)/
i read here, that it is better to use higher rated capacitors than original (100mf and 470mf)/
question is: how much higher capacitors? 150mf and 600 mf? 🙂
You want to keep the farad rating the same… you can buy 25V rated capacitors and they will provide some additional durability. The permanent solution is to purchase the replacement power board from Avaya as the problem board will continue to break.
We have more then 50 phones ,had the same issue in this phoen and we rectify this and i replace the same cap and ip phones are working fine.
Thank for your support
Hi all, this site is a life saver. Successfully repaired 10 of these phones for my work. I never would have guessed that the small caps would be faulty as well becuase they didnt show a buldged top. But true to the fact – they were faulty.
Does anybody know where I can buy screens from for 1120E ?
P.S. The screen supplier must be in UK.
Cheeerrrrrs.
Hi All,
Has anybody found a repair solution to dark shadowing on display for the 1100 series phones?
Folks,,, what kind of LAN supplier you are running your phone on? (Cisco, Avaya, Brocade….) Thanks. We seems to have the same issue and I’m curious what is your PoE source.
I had this power supply board issue. The information from the thread is very useful. I would like to share my experience, hope it would help others.
Have been using this Avaya/Nortel 1140E phone since 2013. I disconnected the phone for the last 10 months due to renovation and new building cabling project. Plugged it back into the same POE switch as it did for last several year. Phone did not boot up. The lights had a flash, POE switch reported the cable had a short.
Googled the issue and found this SLUSAMSON thread/post about the power supply capacitors. Followed the instructions. Removed the 7 screws and opened up the phone and took out the power board. Saw one of the two 10V 470uF was bulging at the top and bottom. This is a sign for bad capacitors. Removed the two 10V 470uF and replaced them with can-style surface mount 35V 300uF and 150uF. They were the only capacitors that I could savage from old an PCBA board and fitted into the space. I have to straighten the leads and trimmed them narrow to fit into the holes. I did not replaced the 25V 100uF capacitor as they appeared to be good. After putting everything back together, and plugged it back to the POE switch, the phone is working again.